October 23, 2023
6 minutes read
Recently, a fellow Tape Partner, John(1F2Ns), posted on the community forums (an excellent place to visit if you are interested in Tape and what it can do) asking if anyone had built a solution to get the distance between two locations from the Google API in Tape.
Although I hadn’t, it got me thinking about all the possible use cases and benefits for small to medium businesses; the most obvious being a mileage expense claim/log. I felt it was worth a look on a rainy Saturday, so I dived head-first down the rabbit hole. Anyway, I emerged a few hours later with what I feel is a good example of how it could work.
Part One
If you just want an example of it working, then this first part is for you. It can obviously be adapted to a number of different scenarios. Another example could be a transport planning app where you pull in addresses through a relationship to your client’s app.
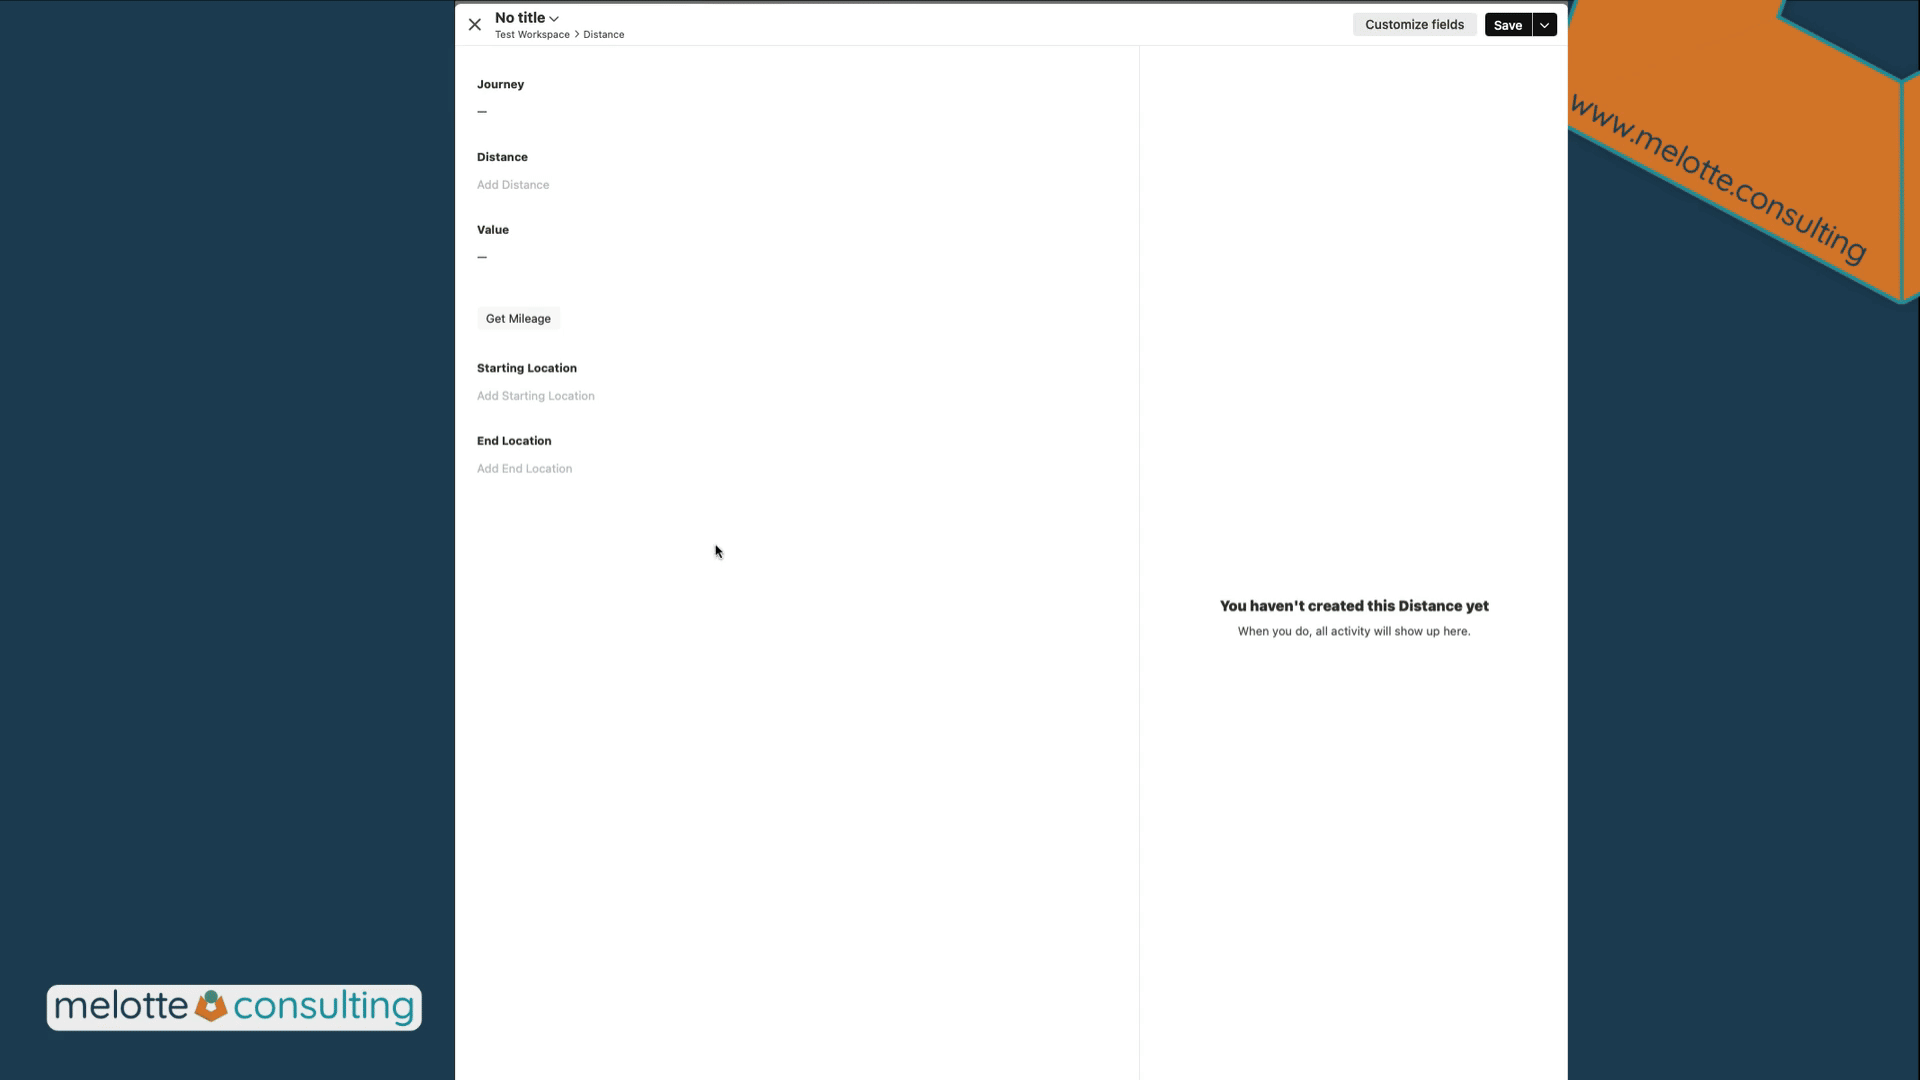
In the demonstration above, you simply fill in the two location fields, save the record, hit the ‘get mileage’ button (the button could be removed so it happens automatically on record creation), and off it goes to Google, asking for the distance between the two locations. It takes the response, adds it to the record, does a quick calculation to get the claim amount, and generates a title from the data.
(you can see a video here if thats more useful)
Ideally, for a full system, other workflows would be added for routing, notification, etc. and should also reference the user.
Part Two
In Part Two, we will get more into the technical aspects of achieving Part One. So, if you’re interested in building this yourself, read on. If the term ‘API’ lost you, reach out to us here and we can talk about how we can help you.
Stage One
You need a Google account linked to an API key that has access to the Google Maps system. This is very easy to set up, and Google takes you through it better than I can. I started on this page and went from there. You are likely to need a credit card, as Google uses it as a check against bots, etc. There are also potential costs associated with using the Google service, so make sure you are aware of these and comfortable before you move forward.
You should now have your valid API key so we can move on to the next step.
Stage Two
For the rest of this, we will be in Tape. If you don’t already have a Tape account, grab one here. This is not an affiliate link, but if someone from Tape asks, mentioning us would be great ;)
I’m going to assume you can work out how to create a new Workspace and App. If you can’t, that’s fine, but honestly, you probably should go back up to the top of Part Two and click the link to get in touch with us.
So set up an app with fields similar to the ones we have. Remember, you will need to change any differences in the next stage as well.
The other option is to click here and you will get sent a link to download a template with the complete demo (you will still need to add your Google API key).
Stage Three
The workflow is going to look similar to this:
So let’s get started. Top right of your screen, click the lightning bolt and then click ‘Create new automation.’
We will make this an on-update trigger.
Stage Four
We will now explain each step:
-
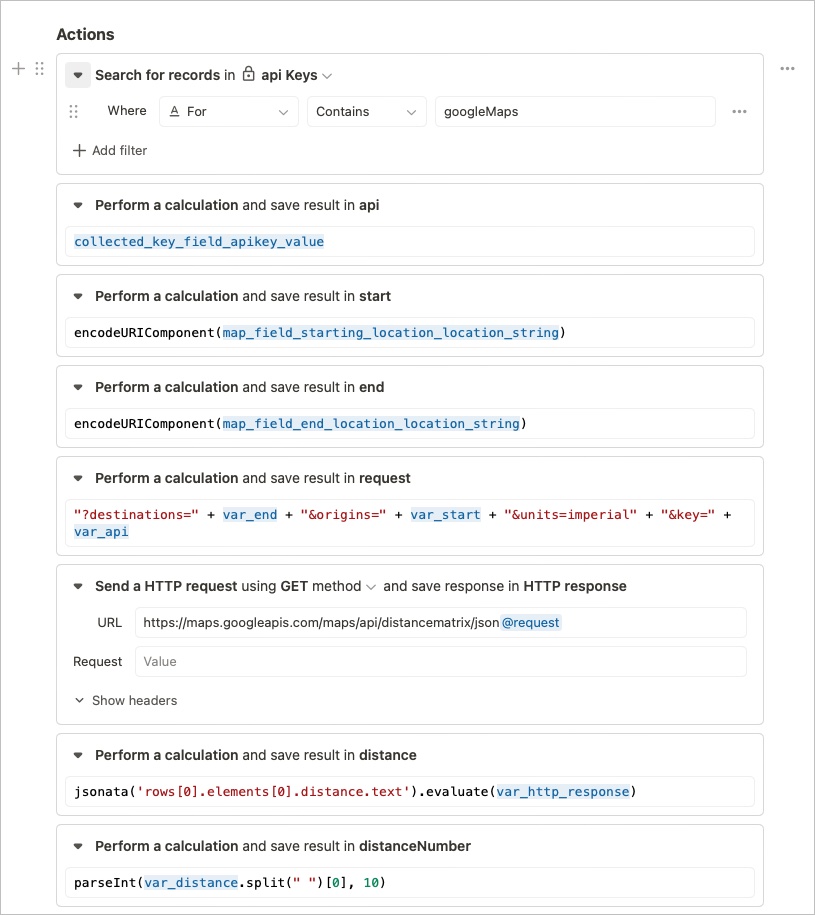
You need to enter your API key and this is where you do that. I store all my API Keys in a separate app but you can just copy and paste yours into this calculation field and it will work fine:

-
This is another calculation field, and it gets the start point from the record’s “start location” field and uses
encodeURIComponentto encode the location ready to send. Make sure the names match your setup. If the part in the ‘( )’ is not blue, it won’t work:
-
This third calculation field does the same but for the end location:

-
Now that we have our encoded locations, we can start building the request we are going to send to Google. It is quite a simple request based around the two locations. One thing to be aware of is that the destination is first with the start location second. Where I have put ‘imperial’, that is telling Google to give me the distance in miles instead of kilometres. Now when Google sends back the response, it does so in two parts: a text part and a Value:

The ‘imperial’ option only changes the text part not the value, which remains in metres always. Therefore if you want kilometres rather than miles, you can either leave the imperial option out or perform your calculation on the Value and convert it into kilometres. The last part of the request is your API key pulled from the first calculation field:

-
The next bit adds our response to the google URL ready to send it out to Google. Why do I put my request variable on the URL line rather than in the nice ‘request’ box underneath? Honestly, I don’t know - it works for me though and as I build the request higher up, it doesn’t get messy:

-
Google will send back a response which will look something like:
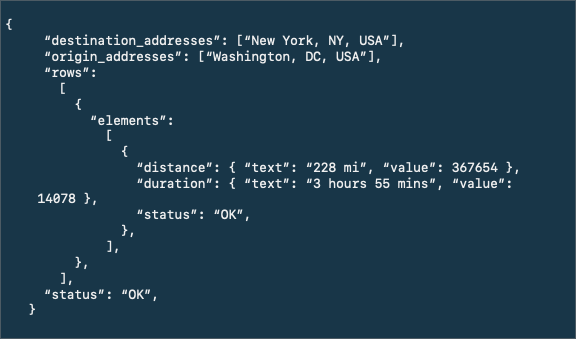
This next calculation field goes into that and just pulls out the bit we want, which in this example would be 228 mi - which is great, but still not too much help. But we fix that in the seventh step:

Before we move on though you may remember that above I said that if you wanted your result in kilometres you could use the value key instead and just convert that from metres to KM:

This should give you the 367654 ready to be divided by 1000 to become 367.65 km
- The very last calculation field takes your
228 miand splits it and then takes the228part; however, it is still a string and we really want a numeric value so that we can put it in a number field and run calculations on it later:

-
The final part of this automation is to update the record with the data we have gathered. In the screenshot below, you can see I make 4 updates to the record. We only really need to make one: the second down. The other three are there for debugging really so that you can see what is going on, and these could be removed once you are happy.

Conclusion
Congratulations! You’ve now successfully set up a working demo and gained insight into seamlessly integrating Google Maps API with Tape. In summary, here’s what we’ve accomplished:
- Crafted a request sent to Google.
- Processed the response, extracting the crucial data.
- Fine-tuned the information to fit our desired format.
- Updated our Tape record, providing the foundation for future calculations and workflow triggers. And all of this achieved effortlessly through a Tape Automation. Keep innovating with Tape!